SSIS: Removing HTML from a field using Script Component

Let’s say you are transferring data from the database of one program to the database of another program.  The problem is that one of the fields, say it’s a field called “usedescription” that is a data type of DT_NTEXT, has HTML in it because the program used that HTML formatting to display the text a certain way on it’s screen.  However, the new program doesn’t need that HTML and perhaps that HTML even causes issues.  So, how do you move the data from one database to the other and properly remove the HTML?

In SSIS, you can use the script component and the HTML Agility Pack.  The HTML Agility Pack is a free code library that you can use to parse HTML (or remove it as we are doing).  First, go to the following website to download the library:

http://htmlagilitypack.codeplex.com

Note that you can now get the library via Nuget.

Once you’ve downloaded the library to your downloads folder and unzipped it, note that the HTML Agility Pack contains sub-folders for the various versions of .Net and even WinRT and Windows Phone.  Since we are using SSIS on SQL Server 2014, copy the files in the .Net40 directory to the C:\Windows\Microsoft.NET\Framework\v4.0.30319\ directory of the server that will be running your SSIS packages.  Next, open up your script component and set it in your data flow and add the field in question to the list of inputs (don’t forget to set it to Read/Write).  Click on Edit Script and when the code editor comes up add the HtmlAgilityPack.DLL to your list of references (you may have to browse for it to add it).

image

You will also need to add the namespace: using HtmlAgilityPack;

Here is the code in the script component with comments along the way (note that I took out the stuff we don’t need):

image

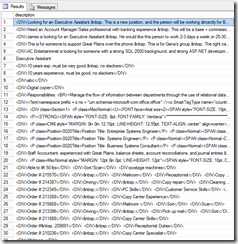
When running our SSIS package, the HTML Agility Pack removes unwanted HTML quite nicely.  Check out our before and after screenshots:

Before:

image

After:

image

Obviously, there is more clean-up to be done.  However, getting the HTML out was a good first step.

JamesNT

SQL Server: Migrating a Database from version 2008 to 2012 Part II

In our last post, found here, we used the backup and restore functionality of SQL Server 2008/2012 to move a database from one version to the other.  Be reminded this is a one way transfer.  The SQL Server 2012 version of the database cannot be moved back to 2008 to the best of my knowledge.  Even though you may set compatibility to stay at 2008, the format of the database files is changed.

Today, we’ll look at the second way to move a database from SQL Server 2008 to SQL 2012:  Detach and Attach.  Note that this is not the preferred method of moving a database from one version of SQL Server to another – or even to another SQL Server of the same version.  The reason is this method involves downtime.  When you detach a database, connections to that database may be dropped and no one can connect until the database is reattached.  Let’s take a look.

  image

Note that you can forcibly drop connections to the database.  You may need to do this during a detach as if there are any connections, the detach will fail.  Keep in mind that many Line-of-Business applications do not like having their connections forcibly closed on them and may themselves crash.  Also note that once you detach the database it will no longer be listed in your database list.

image

Once the database is detached, you can using Windows explorer to copy the database files to the new location on the new server.  Once the files are there, you can attach them to the new server.  If you still need the database active on the old server, don’t forget to re-attach it using the same procedure shown below.

image

image

You may need to set file paths.

image

Once you click OK the database will be attached.  Again, be certain to note that the database file format will be upgraded making it unusable on former versions of SQL Server.

As noted previously, this is not the preferred way to upgrade, or even just relocated, a database to a new server.  It does involve downtime and you may have to kick people off for it to work.  The preferred method, in my opinion, is to do a backup and restore.

JamesNT

SQL Server: Migrating a Database from version 2008 to 2012 Part I

A lot of companies out there are still on SQL Server 2008 (some are still using 2005!).  Now that SQL Server 2012 has been out awhile, I’m seeing questions on what it takes to migrate a database from SQL Server 2008 to 2012.  The bad news is doing an in-place upgrade from 2008 to 2012 is out of the question.  For one thing, many of you are still running SQL Server 2008 on Windows Server 2003 and SQL Server 2012 requires Windows Server 2008 Service Pack 2 or higher.  So you’re going to stand up a new server no matter what.  The good news is that it’s still easy.  In fact, you have two ways to do it.  Either perform a backup and restore or do a detach and attach.  This part covers backup and restore.

Backup and Restore

You can back up your SQL Server 2008 database and restore it to a SQL Server 2012 machine.  Keep in mind that I’m talking about user databases, not any of the system databases.

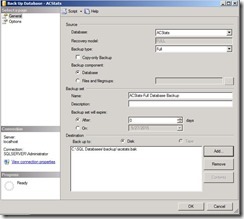
First, back up your SQL 2008 database.

backup20081

backup20082

Once your backup is complete, copy the BAK file over to your new server.  Once done, restore the database.  Note that you don’t have to create a database first just to restore over it.

2012restore1

2012restore2

2012restore3

2012restore4

Once your database is restored, you can set compatibility level options in case you have older applications that expect some type of older behavior.

image

Keep in mind that this option is not a panacea and that you should thoroughly test before just shutting off your old SQL Server 2008 machine to ensure current applications don’t depend on some old behavior or deprecated feature.  Also, do keep in mind that despite setting the compatibility level to SQL Server 2008, the database file format itself is still upgraded to SQL Server 2012.  This means you cannot move the database back to your old SQL Server 2008 machine.  If you need to move back, you’ll have to extract all the data that has changed since the last backup and import manually.  I know of no way to restore or attach a SQL Server 2012 database to an older version of SQL Server.

JamesNT

SSIS: Using Expressions to build SQL Statements for ADO.NET Connections

In SQL Server Integration Services, you can specify that an OLE DB Connection use a SQL Statement from a variable.

image

Using this approach, you can dynamically build SQL statements using the OLE DB Connection.  But what about ADO.NET?

image

It appears we have no way to dynamically build SQL statements when using ADO.Net providers.  And to think I’ve been standardizing on them.  On the other hand, maybe we do have a way.  I made a package with two variables.  One is a DateTime called LoadControl and the other is a string called strSQL.  I’m going to load a DateTime from a load control table into the LoadControl variable then use the LoadControl variable to build the WHERE clause of a SQL statement to pull out all medical claims with a date of service greater than or equal to the LoadControl date.  First, our variables.

image

Nothing hard about that.  Next, our Execute SQL task to populate the LoadControl variable.

image

image

Next up, our data flow. 

image

The only thing I’ve done is set up the ADO.Net Source.  Now we need to get our strSQL variable populated.  First, be certain to set the property EvaluateAsExpression to TRUE for strSQL.

image

Next, create an expression for this variable like so.  Notice that since DateTime variables cannot be NULL when you create them, SSIS fills in the current DateTime, hence the 5/3/2015 7:38:04 PM.

image

Now the interesting part.  From the Control Flow, single-left click your data flow to highlight it.  Now, look over at your Properties for your data flow.  Scroll down to the Misc. section. 

image

That’s right, you see the SQL statement for the ADO.Net source.  Of course, this is where it is important to call your connection sources something meaningful so you can find them readily (I didn’t bother since we only have one).    Notice that we have two spots for the ADO.Net source:  SQL Command and TableOrViewName.  We aren’t going to change the SQL statement there.  Rather, go down further until you see Expressions.  That’s right, build an expression.

image

image

Notice that for this expression, we only need the strSQL variable.  Once you have that saved, put a data viewer on your package and run it.

image

Notice that only dates for 4/10/2015 or higher are shown (I added an Order By to the SQL Statement in strSQL and 4/10/2015 is what was in our LoadControl Table).  This is where our Expression was evaluated and placed in for the SQL Command of the ADO.Net source.  One thing of note, notice how before I set up a SQL statement in the ADO.NET Connection when I first created it earlier.  This statement is IGNORED when the Expression is evaluated.  However, if the SQL Statement in your Expression adds or changes columns, you may need to go into the Advanced Editor of the ADO.NET Connection and click Refresh to get those changes to show.  Otherwise, your new or changed columns may not show up in the data flow right away.

image

With this approach, you can still dynamically build SQL statements for ADO.NET Connections like you can OLE DB Connections.  A little more work, yes, but I think worth it when you have lots of Script Tasks/Components that need to use Connection Managers.

JamesNT
SSIS: Why You Should Use Temporary Tables

There seems to be some debate about the use of temporary tables in SSIS. I, for one, highly recommend using temporary tables rather than trying to pull data from different sources straight into your database production tables. Consider the following:

  • You are pulling data across a VPN connection when the connection suddenly fails. Perhaps a router failed or something, but now you are stuck with a partial pull.
  • There is some type of unexpected corrupt data that causes your flow to error out. Again, you are stuck with a partial pull.

In the above situations you’ll now be stuck with production tables in a production database that have records that need to be cleaned out. At best, you’ll have to figure out which records made it and which didn’t and then make up the difference. By using temporary tables in your production database all you have to do is wipe out the temporary tables and then start over after figuring out what the error is – the idea being that once the data makes it into your temporary tables you now have full control and no longer have to worry about VPN’s going out or data needing to be changed or cleaned as all that has already been done.

So in your SSIS package you pull data over to your database into a series of temporary tables that might in face have the same structure as your production tables just with different names. Then you pull the data from your temporary tables into your production tables. Some even go as far as to have a separate database just for temporary tables which is perfectly fine.

Remember, when pulling data from other sources, especially outside sources, unless you have some ownership over said sources you control only half of the operation. You have no guarantees as to whether the source is reliable or the data is clean. Therefore, it is very likely your dataflow may be interrupted.

See my post on handling temporary tables in Access.

JamesNT

Handling Truncation in SSIS

Truncation is what happens when you try to fit a string of one length into a field that holds a string of a shorter length.  In most cases the last characters of your string are cut off so it will fit in the field.  Of course, in the case of SSIS your package will error to a grinding halt if truncation is not explicitly handled.  We see truncation very often in fields such as first name, last name, address, and so forth when moving data from one platform to another.  While there are many ways to handle truncation, I’m going to discuss some of the more common I’ve seen here along with their plusses and minuses.

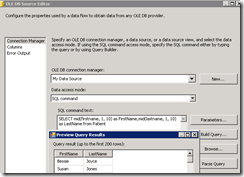
Approach One:  Use Substring() ,or equivalent function, in your SQL statement to pull out only as many characters as you can handle in the destination.  In the example below, we are using the Mid() function since we are pulling from an Access 2000 database.  The FirstName and LastName fields in the Access database are of length 20 but our destination has those same fields of length 10. 

The pros of this approach is that it is quick and easy and keeps your overall dataflow clean.  You don’t have to worry about getting possible truncation errors during different steps of your dataflow.  All of the “mess” is contained in that one nice and neat little SQL statement. 

The cons of the approach are that you will lose data.  You are forcibly truncating strings, after all.  If someone has a long last name, that name is going to come over with the last few letters missing. 

image

Approach Two:  Use a Data Conversion Task to shorten your strings en route to the destination.  You can either ignore the truncation by configuring so in the Error Output, or you can redirect strings that would be truncated to another table. 

The pros of this approach is it gives you the opportunity to redirect any rows that will be truncated to another table or flat-file for later analysis.  This may be very important for some data where you can’t lose anything.

The con of this approach is it makes your data flow a bit messier.  You will have now the “copy of firstname” and “copy of lastname” columns as shown in the screenshot below and the original firstname and lastname columns.  You can remove unwanted columns by adding a Sort task and not letting them pass through, but again, it’s a bit messy.

image

image

Approach Three:  Attempt to use a script component to shorten the data.  Consider the  following code:

public override void Input0_ProcessInputRow(Input0Buffer Row)
    {
        if (Row.AddressOne.Contains("Avenue"))
        {
            Row.AddressOne.Replace("Avenue", "Ave");
        }
        if (Row.AddressTwo.Contains("Suite"))
        {
            Row.AddressTwo.Replace("Suite", "Ste");
        }
    }

Notice that we are attempting to replace certain words commonly found in addresses with their abbreviations.  This approach is commonly used with approach two so as rows get redirected, more words can be found to be abbreviated thereby cutting down on error.

The pros of this approach is that it can certainly cut down on truncation in a more acceptable way.

The cons of this approach is that it will not work for all data and it can be hard to maintain as you are constantly adding cases to your switch statement or more “if’s” in the case of this example.

Truncation is one of those things that you are guaranteed to deal with when working with data.  Some vendors are certainly more generous with space in their database than others.  Why do some vendors make some string fields so small?  Who knows.  But at least we do have a few options on how to deal with it.  Maybe not perfect options, but options nonetheless.

If anyone has any cool approaches to how they handled truncation, I look forward to reading about them in the comments section or via links to your own blogs.

JamesNT
SSIS: Dealing With Temporary Tables in Access

When using temporary tables in SQL Server, all you have to do is prefix the table during creation with a “#” (pound sign) and SQL Server knows to delete the table after the session closes.  Example of creating a temporary table in SQL Server:

CREATE TABLE #myTable (
ID int IDENTITY(1,1),
firstName nvarchar(30),
lastName nvarchar(30)
)

Again, if you close your session in SQL Server, the above table will be dropped then and there.  This makes temporary tables in SQL Server very useful to SSIS as they clean up after themselves.

Unfortunately, there are many of us who are still having to deal with all those pesky Access 200x databases running around.  And, unfortunately, Access does not support temporary tables like SQL Server does.  When you create a table in Access, it is there to stay unless you specifically drop it by executing a DROP TABLE statement.

In SSIS, this leads to a bit of a problem.  Let’s say your package fails for whatever reason (lost connection to server, power went out, etc.) before it gets to the step where you clean up all those temporary Access tables (i.e. you have an Execute SQL step that has one or more DROP TABLE statements in it).  The next time that same package is scheduled to run it’s just going to fail again when it gets to the step where you create your temporary tables in your Access database because those tables already exist.

In order to combat this problem, and provide yourself a sanity check as I’m certain that like me you always forget to delete your temp tables while testing which means you get the “table already exists” error a lot, we can put a step in that checks for temp tables in Access and drops them.  Before the step that creates your temp tables, insert a Script Task that runs the following code:

OleDbConnection conn = null;
OleDbCommand comm = null;
public void Main()
{          
    conn = new OleDbConnection(Dts.Connections["Connection Manager"].ConnectionString);
    comm = new OleDbCommand("", conn);
    conn.Open();

    if (checkForTable("Demographics"))
    {
        comm.CommandText = "DROP TABLE Demograhpics";
        comm.ExecuteNonQuery();
    }
    if (checkForTable("newBills"))
    {
        comm.CommandText = "DROP TABLE newBills";
        comm.ExecuteNonQuery();
    }
    if (checkForTable("newTrans"))
    {
        comm.CommandText = "DROP TABLE newTrans";
        comm.ExecuteNonQuery();
    }
    conn.Close();
    conn.Dispose();
    Dts.TaskResult = (int)ScriptResults.Success;
}
private bool checkForTable(string tableName)
{
    string[] restrictions = new string[3];
    restrictions[2] = tableName;
    DataTable dt = conn.GetSchema("Tables", restrictions);
    if (dt.Rows.Count == 0)
    {
        return false;
    }
    else
    {
        return true;
    }
}

Notice that this code checks for three tables:  Demograhpics, newBills, and newTrans.  You can, of course, keep adding “if” statements to check for your temporary tables or you can pass in an object variable that you can loop through that checks for a list of tables.  This way, if your packages fails for some reason during one run, on the next run any temporary tables in Access will be dropped before the task that creates them executes.

There may be other more elegant ways to handle this problem.  If I think of any, I’ll post them.  You, of course, are welcome to mention other ways in the comments section.

JamesNT
Sometimes in SSIS, You Just Need to Wait

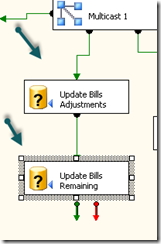
In one SQL Server Integration Services (SSIS) package Data Flow, I have two OLE DB Commands that have to run one after the other.

image

The problem is that I am updating the same table in a Microsoft Access 2000 Database in both steps.  So, when there are many records, the second OLE DB Command throws an error complaining about the table being locked.  Of course, the table is locked by the first OLE DB Command that needs just a few more seconds to finish what it was doing. 

So how can I give enough time for the first OLE DB Command to finish before invoking the second one?  Well, in this particular case, I am blessed with the fact that I am pretty much guaranteed that there will most likely never be more than 40 records to go through this data flow when it runs (this information is from a single provider doctor office and 40 is the most patients he can see in one day).  So, all I need is a stop gap. 

The solution is to add a Script Component between the two OLE DB Commands.  Once there, edit the Script Component and add the following two lines:

image

What we are doing is calling the Sleep function in C# and telling it to count to 10 (the argument is in milliseconds).  This way, the first OLE DB Command has 10 seconds to finish; thereby unlocking the table, before the next one begins – and with 40 records that should be plenty of time.

I do not claim this solution to be elegant; however, it does work as intended and it solves the problem.  I welcome more elegant solutions in the comments.

For more information about the System.Threading.Thread.Sleep() function, see this MSDN web page.

James

If Connecting to Someone Else’s FTP/SFTP/FTPS Server Using SSIS, Be Kind

In SQL Server Integration Services, there is a FTP Task you can use to upload and download files to or from, respectively, a FTP site.  If you need to upload or download from a SFTP or FTPS site, you’ll need Ivan Peev’s SFTP Task from CozyRoc (www.cozyroc.com).  I’ll have a lot more to say about Ivan and his superb suite of tools for SSIS later.  The issue we are talking about today is showing some common courtesy to the owner of the FTP site via a way you probably haven’t thought of.

A few months ago, I got a call from Joel Hoover who maintains the FTP site for RealMed, our clearinghouse we use to send electronic claims through (www.realmed.com).  Joel informed me that, according to his logs, when we downloaded or uploaded files to his site, we were making upwards of almost 500 connections per day.  After doing some quick math, I realized that we should, at most, be making about 6 connections per day since we only download or upload files from their site 6 times a day, so where did he get 500 from?  I informed him that this must be some sort of mistake but then he emailed me a screenshot of the logs with concrete evidence that, yes, we were connecting to this site around 500 times per day – sometimes more.  I did some digging and found the culprit. 

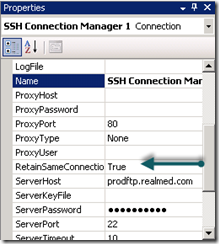
In SQL Server Integration Services, each Task that executes something against a data source must have a Connection Manager.  The FTP Task is no exception.  It has a FTP Connection Manager (or SSH if you are using Ivan’s tool).  And, like most of the other Connection Managers, it has configurable properties – and I’m betting some of you know where I’m going with this already.  Here is a screenshot:

image

Notice the properly value RetainSameConnection.  By default this is typically set to FALSE.  You have to remember to set it to TRUE.  So, what was happening is that as I looped through all the files on Joel’s FTP site in my SSIS package, I was constantly:

Open connection
perform some operation
Drop connection
open connection
perform some operation
drop connection
open connection
perform some operation
drop connection

You can probably see how the FTP owner, Joel, was freaking out over this.  By changing that one value, I was able to reduce our number of connections from well over 500 down to about half a dozen for the entire day.  By setting the value of RetainSameConnection to TRUE, the first connection made to the FTP site is retained for all future uses of that Connection Manager throughout the life of the SSIS package.

In fact, I would say that, unless you are changing your connection string in your connection manager (i.e. looping through csv files, for example), I would recommend always changing the value of RetainSameConnection to TRUE.  This will reduce the overall overhead of your SSIS package and not hammer your data source so much.

James

Accessing a remote file share in SQL Server Integration Services

Imagine the following scenario or something close to it:

  • You have an IPSEC VPN to another network from yours.
  • There are some CSV (or other) files on a file share that you need to access.
  • The computer owning the file share is not a member of your Windows domain.
  • For some reason (just pick one) the idea of installing a FTP service or other thing on the remote computer is not an option.

This presents a problem because, unless the person who owns the remote computer is willing to seriously compromise security (and you have the guts to ask him to do so), you aren’t getting to those files using SSIS – at least not in a completely automated fashion.  Or are you?

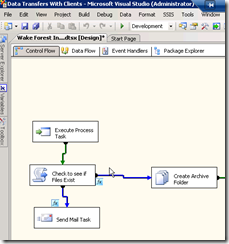
Using SQL Server Integration Services, you can access a remote file share with a username and password provided by the remote computer owner while SSIS is running as a scheduled task using the SQL Agent – completely automated.  Check out the following screen shot.

image

The rest of the SSIS package is cut off as it is irrelevant to our discussion.  We are interested in, specifically, the Execute Process Task.  Let’s double-click on that task to see what’s up.

image

In the execute process task we are doing something I am certain most of you have done before – use the command interpreter – cmd.exe – to map a network drive using the NET USE command.  For those that need a refresher on the NET USE command, visit this TechNet web page.

Let’s go through the fields to see what we have.

  • RequireFullFileName – False

Indicates whether the task fails if the executable is not found in the specified path. We aren’t worried about this since we know CMD.EXE is in %windir%\system32. 

  • Executable – c:\windows\system32\cmd.exe

The fully qualified path to the executable you want to run.  I assume you have installed Windows to the default directory. Use %windir% if you are not sure or have Windows installed some place else.  So that would be %windir%\system32\cmd.exe.

  • Arguments – /C net use y: machineIP\sharename /USER:username password

Specifies the arguments for the executable. In this case, the NET USE command and its arguments.  Also, notice that we are throwing the “/C’” switch to cmd.exe. That means to carry out the command specified by string and then terminate.  We don’t want a command prompt lingering around after we are done.  Basically, do your job and leave is what we are saying.

  • WorkingDirectory – c:\windows\system32

Specifies the working directory of the executable. Set to the path that cmd.exe is found in. Use %windir% if you are not sure or have installed Windows elsewhere.

  • FailTaskIfReturnCodeIsNotSuccessValue – True

If we get a failure code for the return value of the command, then fail the task.  You, in most cases I’m sure, want this to be true.

  • SuccessValue – 0

Obviously, we must spell out the success value to look out for.  CMD.EXE usually returns a value of 0 if a command is successful.

  • TimeOut – 0

It should take no time at all to map a drive.  The default value is fine.

  • WindowsStyle – Hidden

Remember, we are running this fully automated.  You probably will not even be logged on the computer when this SSIS package runs.  Therefore, you do not want a Window.

Once this task runs in SSIS, you should then be able to access any files in the remote file share.  Do keep in mind that what you can do with those files is up to the remote administrator.  If you cannot write to the files and need to, you may need to ask the remote administrator for write privileges.  Also, accessing this drive will work as long as the SSIS package is executing.  Once execution of the SSIS package is complete, the file share access goes away as it is not persistent. 

I’d be interested to know if this helps anyone.

James