One Group of Users, Two Terminal Servers, and Two GPO’s in one Group Policy Container

Imagine you have the following situation:  You have a group of users who need to access two different terminal servers.  If both machines required the same settings, that would be a no-brainer, but this isn’t the case.  One terminal server requires a certain set of Group Policy Settings and the other terminal server requires different settings (in my case, the settings in question were the start-up application).  And both servers are members of the same GPO.  How do we handle this situation?

Although there are probably a few solutions to this problem, the one I used was implementing a WMI – Windows Management Instrumentation – filter. 

Open the Group Policy Management Console and go to Forest | Domains | Domain Name | WMI Filters and create a new filter.

image

The two filters I created are called WMI Legacy Terminal Server and WMI New Terminal Server.  Edit the WMI filter you just made and enter the following WMI Query statement:

SELECT * FROM Win32_ComputerSystem WHERE Name = “servername” and Name <> “servername”

Your screen should show something like this (don’t forget to replace “servername” with the names of your servers):

image

The statement should give away what we are doing.  We are going to apply a filter to each of the two GPO’s so it will process only for a computer matching the name of the server we want.  Therefore, for one Group Policy Container, we are going to have two terminal servers and two GPO’s that are all members of that one container but only a certain GPO will execute for a certain terminal server.  After you have made your two filters, click on the Group Policy Objects in question and apply the correct filter.  Your screen should look something like this:

image

So when User A logs on to the Legacy Terminal Server, one GPO will be applied (in my case start up application X), but when logging into the New Terminal Server, another GPO will be applied (in my case starting up application Y). 

One significant drawback to this approach is that each GPO can have only one filter.  Make certain this isn’t of significance to you before using this approach.

James

Quick Intro to the Juniper SRX Series Security Services Gateway Part V

This will be the last part of our Quick Intro series.  Further posts on the Juniper SRX will be more about doing actual configurations.  Be sure to read up on Part I, Part II, Part III, and Part IV.

In this part, we will discuss a feature of the Juniper SRX that seems to be unique amongst security devices made by its worthy competitors such as Cisco.  This feature is the concept of the Zone.

According to the documentation, “a zone is a logical construct that is applied to an interface as is used as a building block for security policies. . .”  In most devices, security policies allow traffic to go from point A to point B, such as from the local area network to the Internet. or vice versa.  Adding a Zone creates a new dimension in that it simplifies management.  You can have multiple logical interfaces that require similar security grouped into one Zone.

Zones are where you see default names like “Trust,” “Untrust,” and “DMZ” scattered throughout the Juniper documentation.  In earlier products, those were the default zones.  Starting with the SRX, you can rename your zones to what you want and have as many zones as you want.

As we mentioned earlier, logical interfaces are added to a zone.  We also know that each physical interface can have many logical interfaces, called Units.  So with this much granularity, one physical interface can handle traffic, at the same time, for a wide variety of purposes.  You can have physical interface fe-0/0/3 handle traffic for 5 different VLANs, each VLAN belonging to a different zone.  Just remember that a logical interface can be a member of only one zone.

The following is an example of the default zones that come with the SRX once you do the initial configuration:

security-zone trust {
     host-inbound-traffic {
          all;
     }
     protocols {
          all;
     }
     interfaces {
          vlan.0;
     }

Notice that we have created a security zone called “trust”.  For inbound traffic, we are allowing everything as the keyword “all” indicates to pass to the SRX.  We are also allowing all protocols.  And we are binding this policy to the vlan.0 interface.  Note that physical interface fe-0/0/1 through fe-0/0/7 was assigned to the VLAN as switching interfaces.  What this means is that ports 1 – 7 on the front of the device are all going to behave like a regular network switch and all all traffic to pass through them as long as that traffic is on the same VLAN.  Of course, this begs the question:  What about Internet traffic?

security-zone untrust {
     interfaces {
          fe-0/0/0 {
               host-inbound-traffic {
                    system-services {
                         dhcp;
                         tftp;
                    }
               }
          }
     }
}

Notice that we have another zone called “untrust.”  Appropriate name given that we are allowing Internet traffic.  Notice that, in contrast to the “trust” zone we are not allowing anywhere near as much latitude.  We allow only dhcp and tftp to pass through this zone straight to the physical interface fe-0/0/0.  So, yes, we can bind a physical interface to a zone, not just a logical one.  And we can severely restrict traffic.  DHCP is allow, of course, in the event that we do not have a static IP address from our ISP.  I’m not sure why the default configuration allows tftp.  I typically remove that.  Do keep in mind that the host-inbound traffic part of a zone is the traffic that goes to the SRX itself, not what is passed from one host to the next.  Security Policies are used to govern traffic from one host to the next.  We’ll talk about those later.

In wrapping this up, we can have a physical interface bound directly to a zone or to any number of logical interfaces that can then be bound to zones.  Zones then have Security Policies.  Obviously, we would bind interfaces, physical or logical, that have like security requirements to one particular zone.  Take a few moments to think about this arrangement and I do believe we can see how we can handle traffic in a very large number of ways.  Also, do keep in mind that all of this ability is even on the low end SRX100 which is a only a few hundred bucks.  You do not have to purchase a $5000 device to obtain what we have talked about thus far.

There is much more to discuss regarding zones, but this is only a quick intro.  As time moves on and I begin configuring the device, more we be explained in higher detail.

James

Exchange System Manager: The Token Supplied to the Function is not Valid 80090308

I received this error on a SBS 2003 box that I’m going to be migrating from later this year when trying to view public folders from the Exchange System Manager.  Like many others, I tried the usual solutions found here, but in the end this blog post is what worked for me:

http://blogs.technet.com/b/petergal/archive/2006/05/12/428152.aspx

While I post that link as a credit to the original author from whence this solution came, I also notice the link is to a blog that is now defunct as the last post was over 5 years ago.  Therefore, I’ll also post the complete steps here just in case that blog disappears or something.

Warning:  We will be using ADSI Edit to directly edit Active Directory.  If you are uncomfortable using this tool, please contact a support professional.  Misuse of ADSI Edit can render your entire Active Directory unusable causing you to have to invoke disaster recovery procedures.

Notice:  These steps are to resolve the error in question on Exchange 2003 running on Windows Server 2003. 

Step 1.  If you haven’t already done so, you’ll need to install the Support tools for Windows Server 2003.  The tool you’ll need is ADSI Edit.  For more information on ADSI Edit, including how to install it, please visit this link

Step 2.  After following the steps in the link in step 1 to get ADSI Edit up and going, navigate to the following location in ADSI Edit:

Configuration >

     Services>

          Microsoft Exchange>

               Domain Name>

                    Administrative Groups>

                         First Administrative Group>

                              Servers>

                                   Server Name>

                                        Protocols>

                                            HTTP>

                                                  1>

                                                        Exadmin

Right click on Exadmin and choose properties.  Your screen should look something like this (I blotted out the client’s server name hence the red mark):

image

If the property for msExchSecureBindings is 443, double click on the setting and remove it.  You want the msExchSecureBindings setting to be <Not Set> as my screenshot shows.  Once you make the change, OK out and close ADSI Edit.

Step 3.  Restart the Exchange System Attendant and then restart the IIS Admin Service.

Once all the services are restarted, you should be able to administer public folders from the Exchange System Manager again.

If you still have some Exchange 2003 boxen running around, like I’m sure many of you do, you may wish to add this to your list of fixes.

James

Quick Intro to the Juniper SRX Series Security Services Gateway Part IV

In Part III of our Quick Intro Series (don’t forget Part I and Part II), we discussed getting the SRX up quickly as a basic router.  We did, unfortunately, skip over some pretty important details along the way such as interfaces and things like that.  In this fourth part of our series, we’ll look at some of the other details of the SRX Series Gateway and introduce some additional terms one must know.

One of the things I mentioned in Part III when setting up the SRX for first use was the setting for fe-0/0/0.  Well, what is fe-0/0/0?  Let’s take a look at the ports on front of the machine:

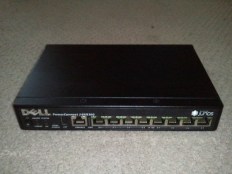
The first ethernet-looking slot you see is the console slot that you can use a console cable to connect with and communicate with the device using Hyper Terminal.  The actual ethernet slots are the ones out to the right of the console slot and they are labeled 00 – 07.  For the Juniper SRX, the slots – interfaces as they will be called from now on – are represented by a naming scheme that describes them in detail.  The following breaks it down:

fe-0/0/0 – media type

fe-0/0/0 – Flexible PIC concentrator number

fe-0/0/0 – Physical Interface Card number

fe-0/0/0 – Port number

Obviously, for a device as small as the SRX100, we will never have to worry about the Flexible PIC number or the Physical Interface Card number ever getting above zero.  On the larger datacenter devices which may have rows and rows of interfaces, I’m pretty sure things get interesting real fast.  Let’s take a quick look at media types – the prefix of the interface name:

fe – Fast Ethernet 10/100

ge – Gigabit Ethernet 10/100/1000

xe – 10 Gigabit Ethernet

tl – T1

The media type tells what kind of interface it is.  The SRX100 is fe only which means all interfaces are 10/100 only.  The SRX210 has two Gigabit Ethernet interfaces (ge) and the rest are Ethernet (fe).  Obviously, you’ll need to go to the higher end models to get the higher end Interfaces.  I’ll not be covering all that here since my concentration is mostly going to be on the SRX100 and SRX210 for the branch office (I do not work at a large school/corporation etc. that will utilize one of the bigger models – that and I could only afford an SRX100 for my house.  Smile)

Each physical interface can have many logical interfaces applied to it.  A Logical Interface is an entity with a protocol or suite of protocols, and perhaps a network address, assigned to it.  The Logical Interface is known as a Unit.  A Unit contains protocol definition and each physical interface can have up to 16,000 Units applied to it.  Each Unit has a Family.  A Family is a protocol configuration (Family of protocols).  Here are some examples of Families:

inet – IPv4 network

inet6 – IPv6 network

ethernet-switching – switching protocol if you want this physical interface to just be used in a switch

PPPoE – Protocol used by DSL providers

Here are some examples of Logical Interface configurations:

  • First Physical Interface set with a static IP address
fe-0/0/0 {
           unit 0 {
                 family inet {
                           address 192.168.30.50/24
                  }
         }
}

This would be a typical configuration used to set this Interface up to work with a static IP address assigned by your ISP.

fe-0/0/2 {
           unit 0 {
                 family ethernet-switching {
                           members vlan-trust;
                  }
         }
}

In this example, we have set another interface up as a switching port on a Virtual LAN called “trust”.  You will see the words “trust” and “untrust” used quite a bit in the SRX documentation.  While you may name a VLAN or security zone anything you wish, “trust” and “untrust” are typically used to represent your local area network and Internet connection, respectively.

We now know that each port, or slot, on the front of the SRX is called an Interface.  We now also know that we can assign Logical Interfaces to Physical Interfaces.  Logical Interfaces include protocol families such as IP settings for different media or to merely have the port act as a switch.  For example, you could assign the necessary protocols, such as a static IP or DHCP if you don’t have a static IP, to your fe-0/0/0 for connection to your ISP and then have fe-0/0/1 – fe-0/0/7 set up as switching ports so you can plug your computers into those interfaces.  Below is how this typical configuration would look in the command line interface of the SRX:

image

Notice that, in the above example, fe-0/0/1 – fe0/0/7 are all members of a vlan called trust.  You could assign each interface to a different vlan (trust1, trust2, trust3, etc.) with DHCP as a service for each one thereby placing every device connected to those interfaces on its own subnet.  Believe me, the fun don’t stop there!  I’ll have examples in future posts.

In our next blog post, we will cover the concept of Zones in the SRX which will end our Quick Intro series to the Juniper SRX.  Further blog posts will cover more in-depth topics.

James

Windows Server 2012 Hyper-V Host Memory Sizing

My good friend, Aidan Finn, has a post on his blog about Host Memory Sizing for Windows Server 2012 Hyper-V.  In his post, he makes this statement:

Microsoft says that the Management OS should have at least 512 MB. That’s being a bit ambitious; I go with 2 GB when I size.

I’m afraid I’m going to have to disagree.  As I posted earlier, I recommend FOUR GB of RAM for the host at an absolute minimum.  My reasoning is very simple:  While I know we all go out of our way to make certain the host is only running Hyper-V, that isn’t always true.  We do sometimes have other things we must do.  And we all know how Windows loves RAM.  Maybe an update is RAM hungry whilst being installed.  Maybe you have automated scripts that run.  Something.  Anything.  Doesn’t matter.  The point is that the last thing we want is the host running low on juice.  And, RAM is cheap so there are no excuses. 

That being said, do let me be clear that my disagreeing with Aidan is not something I do lightly.  Aidan is a great guy, a good friend, and a renowned expert in virtualization.  He is also a published author with two books here and here at Amazon.com.  Please feel free to follow everything else he does without question and without hesitation.

James

Visual Basic 6.0: The COBOL of Our Time

I remember back in the 90’s when those in the technology industry were decrying COBOL and how much of our infrastructure ran on that aging platform.  This, of course, was exacerbated by the Y2K bug as the rollover to the year 2000 really put a face on just how old COBOL really was/is (2000 put that face on many other things as well).

Enter Visual Basic 6.0 – also known as VB6.  VB6 was released by Microsoft in 1998 as part of Visual Studio 6.0.  VB6 had several shortcomings.  Among them:

  • Not a fully featured object-oriented programming language.  VB6 did not fully implement inheritance, for example.
  • Not a stable programming environment.  VB6 would sometimes crash costing the programmer hours of work if it was not already saved.
  • VB6 allowed many dangerous programming habits.  For example, the way it treated NULLS and its implicit type casting.

Despite all these failings, VB6 was used by tens of thousands of programmers for projects ranging from small calculator programs to software that, even today, runs major businesses – including banking.  Because of its simplicity and the way it hid so many of the more difficult aspects of programming, VB6 allowed people who never would have given programming a second thought the chance to create major software.  In VB6, you were never expected to handle pointers, do recursion, or do your own garbage collection.  VB6 hid all those things from you.  With such ease-of-use that allowed even mediocre programmers to develop complex programs with user friendly graphical user interfaces, it is no wonder that there are probably millions of lines of code written in VB6 running today.  It was cheap and easy to get otherwise hard stuff done. 

But, like all other things in the computer world, life moves on – very quickly.  VB6 was replaced by Visual Basic .Net in 2002.  Today, Visual Basic 2012 is about to be released in a couple more months.  Looking at Visual Basic 6.0 side-by-side with Visual Basic .Net is like looking at night and day.  Visual Basic .Net is a fully object oriented programming language with all the modern bells and whistles that come with that title.  Indeed, VB .Net is right on par with other languages such as C++, Java, and C#.

However, what about all those programs written in VB6?  Many of them – too many – are still here.  Major corporations such as Corning, Guildford Mills, General Motors, etc. still have entire sections of infrastructure based on VB6.  Those sections of infrastructure have been in use for years and years.  It’s very difficult to incur expense in the form of not only new programming talent, but also in the form of downtime to replace these sections of infrastructure that have been running for years and years.  Not only that, but in many cases the original programmers aren’t around anymore.  They’ve either quit, retired, or gotten laid off and refused to come back when the company realized the mistake of letting them go.  So now we have entire sections of infrastructure to maintain, and try to replace, yet those with the experience on how it all runs are no where to be found. 

The same thing happened with COBOL.  And, yes, COBOL is still in use today.  VB6 is truly the COBOL of our time because it was good at what it did.  It allowed people, even those that weren’t good programmers, to come up with simple solutions to hard problems without breaking the piggy bank.  Something tells me that in the year 2020, VB6 will still be here.

James 

Officially Supported Guest Operating Systems in Hyper-V 2012

My excellent friend, Aidan Finn, just posted on his blog the official list of supported guest operating systems for Hyper-V 2012.

I couldn’t help but notice that Windows XP and Windows Server 2003 were still on that list.  Question:  Will this be the last Hyper-V they will be supported on?  I haven’t got a clue.  I’m not a virtualization expert.  There is the fact that we are about to see support for XP and Server 2003 expire, but then there’s the fact that if MS doesn’t support them, they might be handing market share over to VMWare.  Of course, let us not forget that Windows Server 2012 isn’t here yet and even when it does get here, that means 10 years of support for virtualizing XP and Server 2003 from Microsoft.

Interesting points to ponder.  My company has one app that requires XP/Server 2003 and we are working hard to replace it.  I’m hoping that in two years, XP/Server 2003 will have fallen off my radar.  I recommend your making similar plans if you can.

James

Access 2013, Word 2013, and Excel 2013

It appears Office 2013 is well on its way.  Three of the teams have already made formal announcements via their blogs.

From the Official Microsoft Word Blog:

http://blogs.office.com/b/microsoft-word/archive/2012/07/30/introducing-word-2013.aspx

From the Official Microsoft Excel Blog:

http://blogs.office.com/b/microsoft-excel/archive/2012/07/18/introducing-excel-2013.aspx

From the Official Microsoft Access Blog:

http://blogs.office.com/b/microsoft-access/archive/2012/07/20/introducing-access-2013-.aspx

James

Quick Intro to the Juniper SRX Series Security Services Gateway Part III

If you haven’t already, be sure to check out Part I and Part II.

In this third installment, we’ll look at what you will find when you first turn on the Juniper SRX Series Security Services Gateway and to get you through some initial configuration.  Be reminded that, as we discussed in one of the previous articles, the SRX I’m using was sold by Dell with the Dell Logo on the device and in the software.  Dell once sold the SRX as the PowerConnect J-SRX Series.  Therefore, while I fully expect there to be some differences between what I have and what you have (one not sold by Dell), I do expect them to be minimal. 

When you first power on the SRX, the first port is usually defaulted to be the port you connect to your ISP.  The other ports are arranged into switching ports all on the same vLAN.  DHCP is turned on and will start giving out IP addresses in the 192.168.1.x range.  As you may have guessed by now, the default IP address of the SRX is 192.168.1.1.

While I did mention that we will not be concerned with the Graphical User Interface of the SRX, it is the fastest way to get the machine initially configured.  If you are going to use Internet Explorer, be sure to put the address 192.168.1.1 in your trusted sites and make certain the trusted sites security setting is set to low.  Otherwise, much of the SRX website (referred to by Juniper as J-Web) will not work.  Below is the initial logon screen.

image

Do remember that you will not see the Dell logo or references to Dell if your SRX is not branded by and resold by Dell.  The default username is root and the default password is blank.  The root user is the super user of the SRX, and that shows off the SRX’s Unix heritage.  Once you log on the first time, you’ll see the initial setup screen.

image

From here you can fill in some basic information to get the device working.  Here are the values I’m entering:

  • Host Name:  I set this to “Juniper”.  You may call the device anything you wish to distinguish it on your network.
  • Domain Name:  I leave this blank.
  • Root Password:  Of course, having a blank password is NEVER a good idea.  There are no restrictions on the password, so it is your responsibility to choose something strong.
  • Verify Root Password:  What is says.
  • DNS Name Servers:  Replace these with the ones assigned by your ISP.
  • Domain Search:  Leave blank
  • Default Gateway:  Provided by your ISP.
  • Loopback Address:  Leave Blank
  • fe-0/0/0.0 Address:  If you have an SRX210, this field may read ge-0/0/0.0 Address depending on what kind of interface you have.  If you are going to get addresses assigned by your ISP via DHCP, leave this field blank.  Otherwise, fill in your static IP address here.
  • Enable DHCP on fe-0/0/0.0:  If you have an SRX210, this field may read ge-0/0/0.0 Address depending on what kind of interface you have. If you are going to get addresses assigned by your ISP via DHCP, check this box.  Otherwise, make sure it is unchecked.
  • Time Zone:  Pretty obvious, those I have never cared for this particular way of choosing time zones.  Why can’t people just use Eastern Standard, Pacific, Central, Mountain, etc.?  Finding the closes city that matches yours is a pain sometimes.
  • NTP Servers:  Fill these in if you so desire.
  • Allow Telnet Access:  Make sure this is checked.  The majority of examples I give will be using Telnet as the way to connect to the device.
  • Allow JUNOScript over Clear-Text Access:  Uncheck this.
  • Allow SSH Access:  Make sure this is checked.  We may use it later.

Now click Apply and wait for a few moments.  Once you are done, you’ll see a dashboard like this one:

image

This dashboard is fairly useful if you want to get a quick estimate of machine condition.  The first thing we need to do is create a new user to use other than the all powerful root.  Go ahead and click on the CONFIGURE tab at the top, then on the left menu that appears click on SYSTEM PROPERTIES and under that click USER MANAGEMENT.  You should now see something like this:

image

In the upper-right hand corner, click the Edit button.  In the new window that appears, click Add.  In the Add-User field, fill out the User Name, Full Name, Password, and Confirm Password fields.  Choose Super-User as the login class.  Don’t worry about the User ID field as it is not required.  Your entry should look something like this:

image

Notice I called my new user Administrator.  First, I’m a Windows guy.  Get used to it.  Smile  Second, usernames are Case Sensitive.  Keep that in mind regarding the SRX.  Go ahead and click OK all the way out until you see the SRX validate your settings and then the prompt telling you that you have to commit your changes.  You’ll find the Commit Options button at the top under the Troubleshoot tab.  On that menu, click Commit.  You’ll then see a Configuration Delivery progress window appear.  Once that window goes away, you’ll see the user you just created.

image

You can go ahead and close the J-Web user interface.  It is doubtful we will ever use it again.  You can probably see why just by the “clunky” feel it has.

Once you are done with these initial settings, you should now have Internet access with your new SRX.  In the next post, I’ll go over the default security settings the SRX puts in place for you.  After that, another brief technical over view on interface types and things like that.  We will then be done with our quick intro series on the Juniper SRX Series Security Services Gateway and will be ready for more serious material.

James